
Views: 0 Author: Site Editor Publish Time: 2026-10-21 Origin: Site


Tile roofs offer undeniable aesthetic appeal and incredible longevity for homeowners. However, they present a significant engineering hurdle for solar professionals. Installing solar panels on these specific surfaces is never a simple plug-and-play process. Your underlying material fundamentally dictates the hardware you need. It also shapes the expected labor hours and your long-term waterproofing strategy. Clay and concrete behave very differently under mechanical stress. You simply cannot treat them the same during a rooftop project. This guide provides a technical, vendor-neutral framework for evaluating your upcoming installation. You will learn how your specific tile material impacts your solar investment directly. We will explore practical ways to mitigate structural risks. You will also discover how to prevent project scope creep before construction even begins.
Material fragility dictates the installation method: Concrete tiles typically support standard tile hooks, while brittle clay tiles often require specialized inset mounting or partial roof replacement ("comp-outs").
Waterproofing is the primary failure point: Proper flashing at the base plate is non-negotiable; reliant caulking is a red flag for substandard installation.
System selection matters: A purpose-built tile-roof solar mounting system prevents tile crushing, load-bearing failures, and voided roof warranties.
Cost disparity is significant: Expect clay roof installations to carry a higher premium (often 15-30% more in labor and specialized hardware) compared to concrete.
The structural reality of your roof dictates every subsequent engineering choice. Materials react differently under human weight and mechanical clamping forces. We must understand these baseline differences to plan a safe installation. Concrete possesses high compressive strength. Manufacturers bake uniform shapes. Installers find concrete highly tolerant of careful foot traffic. You can walk on a concrete roof safely if you know where to step. Clay tells a different story. Terra cotta or Spanish clay is highly brittle. Baking processes create irregular variations across individual tiles. Clay remains extremely susceptible to micro-fractures under any point loads. A dropped tool or a misplaced boot can easily shatter it.
These material differences create a serious business problem. Homeowners face massive risks if contractors ignore material fragility. A poorly executed tile roof solar mounting project can void your existing roof warranties. Latent water intrusion might remain hidden for months. Water slowly damages the underlying decking. Installers also face significant risks. Breakage liability cuts into their margins. Escalated labor hours ruin their project schedules. A broken clay roof becomes a nightmare for everyone involved.
We must define clear success criteria to avoid these outcomes. A successful installation must achieve three mandatory goals:
Zero tile compression: Mounting hardware must never rest heavily on the fragile tiles.
Dual-layer waterproofing: Installers must seal the roof deck level and the outer tile level.
Strict adherence to load ratings: The system must survive local wind uplift and heavy snow accumulation.
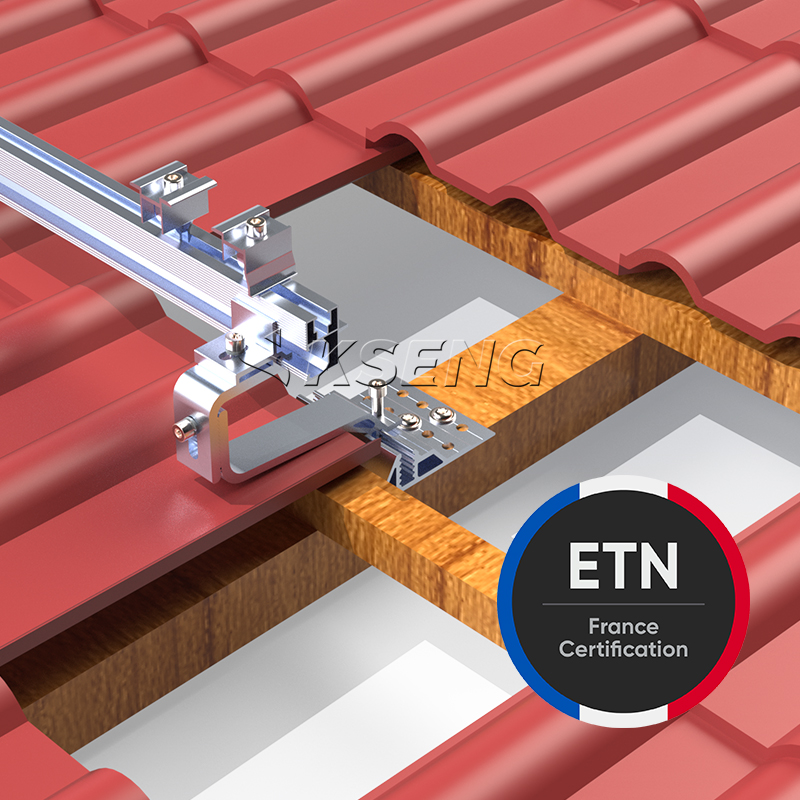
Concrete tiles allow for a relatively standardized approach. Installers usually handle concrete using conventional tile hook systems. The density of concrete makes this possible. They do not need to replace entire roof sections. Instead, they integrate the hardware directly into the existing tile layout.
The hardware mechanics follow a strict sequence to ensure structural safety. Proper execution prevents future leaks. Consider the following standard steps:
Crews remove the specific concrete tile over the target rafter.
They attach a robust base plate directly to the exposed wooden roof rafter.
They route a specialized metal hook out from beneath the upper tile.
Installers ensure the hook maintains clearance and does not rest on the lower tile.
You must evaluate the chosen hardware carefully. Adjustability stands out as a critical evaluation criterion. Roofs often sag over time. Rafters are rarely perfectly straight. You should look for mounting systems featuring multi-axis adjustability. This flexibility helps the Solar Roof Mounting Rack align smoothly with specific tile profiles. It accommodates Flat, S-Shape, and W-Shape concrete designs. Flashing represents another critical checkpoint. Ensure the installer uses rigid metal flashing beneath the hook itself. Do not let them rely solely on the paper underlayment for waterproofing.
Concrete still carries implementation risks. Untrained installers walking carelessly can crack older, weathered concrete materials. Micro-cracks spread during winter freezes. We recommend a proactive approach. Demand a physical audit of replacement tile availability before signing your contract. Know exactly where your spare tiles will come from.
Clay roof installations require specialized defensive engineering. Standard approaches will destroy brittle terra cotta. Installers primarily use two distinct solutions to navigate this extreme fragility.
The "Comp-Out" or inlay solution serves as the industry standard. It avoids clay breakage entirely. The process involves removing all clay tiles directly beneath the planned solar array. Crews then install asphalt shingles or a composite membrane in that exact bare footprint. They mount standard standoffs into this new, durable surface. Finally, they build the array above the composite patch. This approach carries strong pros and cons. It completely eliminates breakage risk under the panels. It also ensures perfect, easily verifiable waterproofing. However, it creates an aesthetic "patch." You will see an ugly asphalt square if the solar array does not cover the stripped area entirely.
The Tile Replacement Mount solution offers a premium alternative. Crews remove individual clay tiles only where they need mounting points. They replace these specific clay pieces with engineered metal flashing tiles. These metal replacements feature integrated mounting posts sticking up through the surface. This method maintains your traditional aesthetic beautifully. The downsides are purely financial and logistical. The hardware is highly expensive. Furthermore, the metal replacements must perfectly match your existing clay tile profile to remain watertight.
You must maintain a skeptical checkpoint during contractor interviews. Be highly wary of installers making bold claims. If they say they can use standard hooks directly over traditional clay barrel tiles, walk away. This bad practice almost guarantees crushed tiles under panel weight. Eventual leaks will destroy your attic.
| Feature | Concrete Tiles | Clay (Terra Cotta) Tiles |
|---|---|---|
| Compressive Strength | High; tolerates careful foot traffic well. | Very low; highly susceptible to crushing. |
| Typical Mount Method | Direct standard tile hooks with clearance. | Comp-outs (inlays) or custom metal replacements. |
| Aesthetic Impact | Minimal; hooks slide between existing tiles. | High; comp-outs require asphalt patches underneath. |
| Hardware Cost | Standard; relatively cost-effective. | Premium; requires specialized flashing or replacements. |
You must evaluate your mounting hardware independently from the solar panels. The rack keeps the system safely attached to your house. A premium Tile-Roof Solar Mounting System addresses load distribution, weatherproofing, and safety compliance simultaneously.
Load distribution acts as the fundamental engineering priority. How does the system handle heavy weight? The rack must transfer the static weight of the panels directly down to the rafters. It must also transfer dynamic pressures from fierce wind and heavy snow. The hardware must bypass the tiles entirely. If the system compresses the tiles to transfer loads, the tiles will eventually shatter.
Flashing and weatherproofing define the lifespan of your roof. Look strictly for systems offering double-flashing. Good hardware flashes at the deck level beneath the underlayment. It also flashes at the upper tile level. You should firmly reject any proposal relying heavily on roofing sealants. Mastics degrade quickly under intense ultraviolet light. Caulking should never serve as your primary water barrier.
Certifications ensure electrical and structural safety. Ensure the mounting hardware carries a UL 2703 certification. This vital standard covers grounding and bonding. It prevents dangerous electrical arcs across the metal frame. The hardware must also comply with local building codes for uplift resistance. A certified system keeps panels attached during hurricane-force winds.
Aesthetic integration matters for curb appeal. Ask how the finished product will look. A good system utilizes black anodized rails. It uses hidden clamps to secure the panels. Raw, shiny aluminum rails clash terribly against warm terracotta or dark concrete tiles.
You will face distinct logistical hurdles during a tile roof installation. Acknowledging these implementation realities prevents frustrating delays. Hidden costs often emerge in labor hours and material sourcing rather than the solar panels themselves.
Sourcing replacement tiles demands immediate attention. Never start a tile roof project without a confirmed stack of spare tiles on-site. Matching faded, decades-old tiles is notoriously difficult. You must define responsibility clearly in your contract. Decide whether the homeowner or the installer will hunt down these replacements. Visiting local tile boneyards early saves weeks of project delays.
Labor hours expand significantly on these projects. You must budget for longer installation times. Working with concrete usually adds one or two days compared to a standard asphalt roof. Working with clay may double the entire timeline. The delicate "strip and prep" phase for comp-outs requires meticulous attention. Crews must move slowly to avoid unnecessary damage.
Vetting the installer requires specific questions. Do not accept general solar experience as proof of competence. Ask for specific portfolios. Demand photos showing their previous work on your exact tile type. Furthermore, verify their internal policy on tile breakage. A trustworthy installer provides a clear, written policy. It should state: "We replace up to X tiles for free; beyond that, we charge $Y per tile." Vague promises lead to expensive disputes.
Tile roofs present unique engineering challenges for solar energy systems. Concrete tiles offer a relatively straightforward path. Installers can utilize modern mounting hooks effectively if they follow clearance rules. Clay tiles demand rigorous defensive engineering. You must use comp-outs or specialized replacement mounts to protect the structural integrity of your home. Cutting corners on fragile clay always leads to leaks.
Base your final vendor decision on structural competence. Do not choose based just on the lowest price per watt. Scrutinize the explicitly stated mounting hardware brand. Evaluate their documented waterproofing methodology. Quality hardware and dual-layer flashing save thousands in future roof repairs.
Take proactive steps before signing anything. Request a structural roof inspection first. Ask your top three solar installers to specify their exact mounting hardware in their bids. Force them to detail their tile replacement policy in the final contract. Clear boundaries protect your investment and your home.
A: Yes, but it typically requires an "inlay" (removing the tiles under the panels) or specialized metal replacement tiles. This prevents the brittle clay from crushing under the mounting hardware. Standard hooks should never be used on Spanish clay.
A: Yes. Expect a premium for both clay and concrete tile installations. The specialized mounting equipment costs more. The labor process is slower and requires extreme care. Installers also factor in the cost of sourcing and replacing inevitably broken tiles.
A: Not if installed correctly. Flawed installations cause leaks. Leaks occur when installers skip base flashing, rely heavily on cheap caulk, or allow mounting hooks to rest directly on the tiles. A code-compliant system connects directly to the rafters with integrated flashing to prevent water intrusion.
A: It is a vital risk-mitigation technique for fragile roofs, usually clay. The installer completely removes the tiles where the panels will sit. They install an asphalt shingle patch. They mount the solar array securely to that patch, then frame the array with original tiles to hide the transition.





